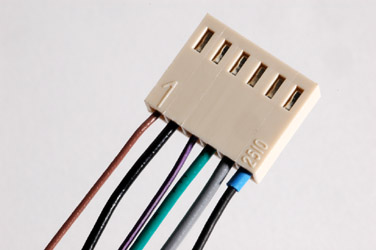
In this step, you'll be constructing the assembly shown here. This socket will plug directly into the ratio board's male header.
You could also simply hard-wire the ratio board to the other components which might improve reliability. The choice is yours.
The selected wire colors conform to the colors used on the original schematic where possible. Due to the availability of certain colors the wire guage varies.
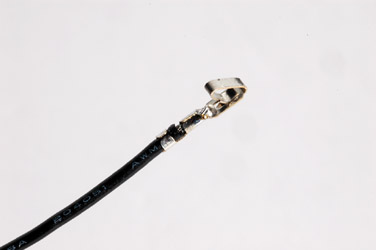
Wires are attached to the Molex sockets as shown. Your socket may be of a different construction but the principle is the same - secure the stripped end of the wire under the crimping area closest to the contact point, then secure the insulated portion of the wire with the crimping lugs at the back of the socket.
I've soldered mine because I do not have the proper tool to crimp these connectors (have a look at the price for Mfg. Part #63811-8200 sometime) and I want to prevent the wires from pulling out of the sockets. But here is the correct way to do it with the proper tool.
Use the colors suggested in the table below if possible. Note that the wire for pin 6 is a single conductor shielded cable. Instructions follow below.
| Pin Number |
Wire Color |
Wire Length |
| 1 |
Brown |
12cm |
| 2 |
Black |
7cm |
| 3 |
Violet |
20cm |
| 4 |
Green |
7cm |
| 5 |
Grey |
20cm |
| 6 |
Shielded |
20cm |
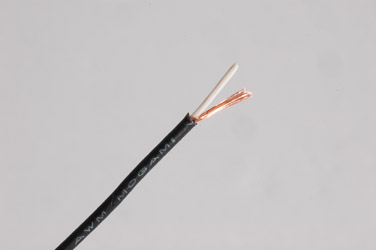
Strip the insulation from the single conductor shielded wire used for pin 6 as shown. The wire I have used Mogami 2444 which is exceptionally thin. You may have to adapt your technique if you are using a thicker wire.

Remove the shield as completely as possible.
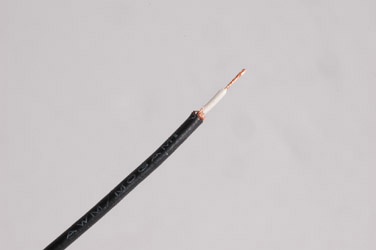
Now strip a small section of the inner conductor.
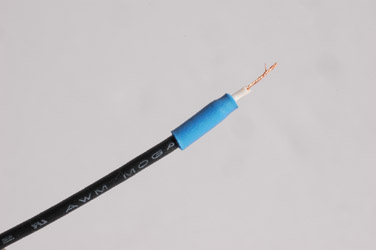
Slip a piece of heat shrink over the exposed bits of shield and shrink in place to avoid any accidental contact or shorts.
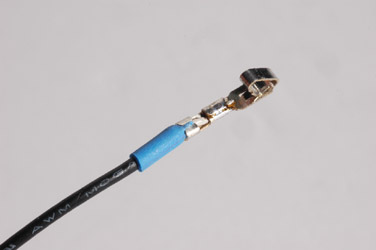
Finally, fit the Molex socket and crimp and solder in place. Crimp the socket lugs over the heat shrunk area as well. Ensure that the shield does not contact any part of the socket or inner conductor of this wire.
Slide each wire/socket assembly into place as shown.
)
)
)
)
)
)
)
)